Painting Twilight is Scary
19 October, 2015 6 comments Leave a comment

A few months ago, I made this watercolour painting for a client and, although it turned out to be a beautiful piece, it was a nail-biting process. For one thing, it is one of very few night scenes I have done, and the first time I painted glowing electric lights. Additionally, the shadows on the snow were very complex and risky to paint, and I had to invent the background scene. Yikes.
The process started with these photos below, supplied by the client. The first one established the angle of the building in the painting, and shows the big evergreen behind the cabin. This property, in central Ontario, is a weekend retreat that the client and her husband own. They go snowmobiling from here, and in the spring, harvest sap from the maple trees and produce their own maple syrup. The client commissioned the painting as a surprise for her husband.

This photo below shows the relative placement of the outbuilding and suggests more background trees - a combination deciduous/coniferous forest.

This photo below was taken at night, and sparked the idea for a twilight setting. Both the client and I thought that would give a more welcoming feel to the painting.

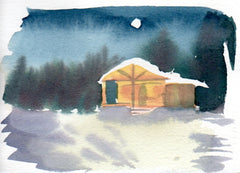
I started the painting project by drawing this 4 x 6" concept sketch below and emailing it to the client. She liked it and asked me to proceed with the painting. We agreed on a finished image size of 12" high by 18" wide, and the client decided to arrange for the framing herself.

I tested out several colour combinations in a 4 x 5" format, shown below. I decided the third one looked best.


The paint colours I chose were Prussian Blue, Prussian Green, Golden Lake, and Carmine Red. All the colours of the finished painting would be mixed from these four tubes of paint. I created the colour chart below as a permanent record of the pigments used, and the colour combinations they produced.

I transferred the sketch to a sheet of 300 lb. cold press watercolour paper, and masked out the moon, birch trees, the snow on the rooftops and evergreen tree, and the highlight on the side of the tree trunk on the right. (I used masking fluid, which protects the white of the paper until near the end, when the masking is removed and light-toned details are added.)

In step two below, the sky has been painted, the first layer of the forest is done, and the first layer of snow colours is complete.

In step three below, the cabin has been painted, using warm brown tones to contrast with the cool blue of the sky. The bright light on the left side of the cabin is just bare white paper. The foreground tree trunk has been painted.
In step four below, I applied a grey wash to darken and subdue the background forest. I added a second layer of shadowing on the snow. When the painting was totally dry, all the masking fluid was removed, exposing white paper.

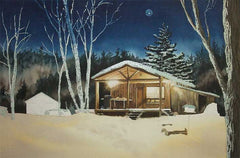
In the final photo below, I have painted in all the details in the previously masked areas, and added a third layer of soft shadows to darken the snow. When I delivered the finished painting to the client, she was delighted with it, and proceeded to have it framed professionally.
Recently she commented: "The picture turned out great. My husband loves it! We celebrated our 10th anniversary in September so I gave it to him then."

'The Cabin: Moonlight and Memories' (watercolour, 12 x 18") by Karen Richardson. Private collection.
For more information on the general commission process, click here.
Subscribe to Karen's Newsletter if you wish to receive studio news updates or notice of upcoming painting classes and exhibitions.


Karen once more you have captured a special feeling, a special tribute and memory. I love it.
Karen, thank you for sharing your painting tips. The process you went through in developing this painting is very helpful. I don’t have a Face Book account so can’t vote for you but I am cheering for you from the sidelines. It is a lovely painting.
I was very intrigued to see how you “built” this painting, especially all of the preliminary work. It turned out beautifully.
Karen this painting gives you the feeling you could walk right into the scene. Beautiful.
Thank you for sharing your creative process as well.
Karen, this is a wonderful painting, looks even better in real life. thanks for sharing the process. You get my vote!
The painting is lovely.It looks so cosy and the lighting makes look warm.It was really seeing the process you went through to achieve the results. I hope you win. Goodluck!