Earthbound Artist

Articles tagged as Painting Classes (view all)

The Making of 'Lapping Waters'

16 November, 2020 2 comments Leave a comment

Lapping Waters, varnished watercolour on panel by Karen Richardson

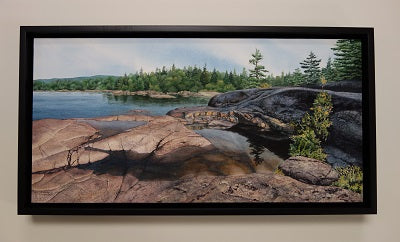
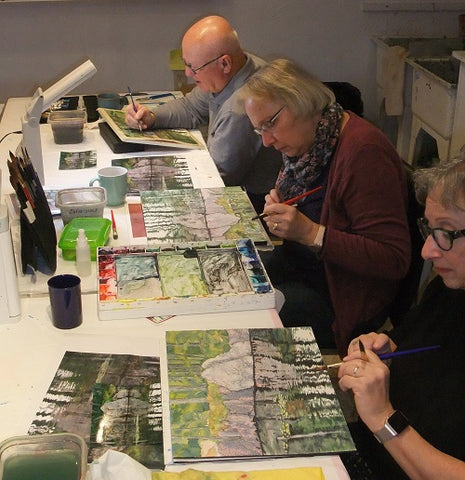
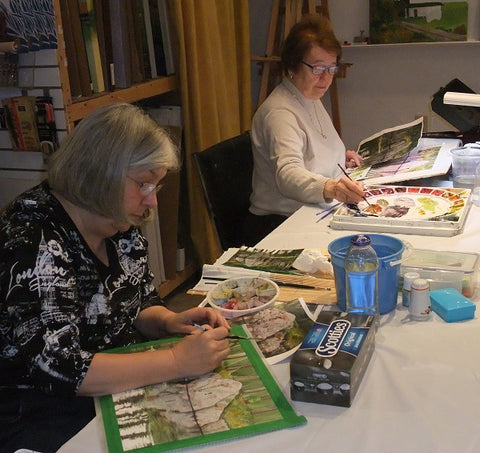
Shown above is Lapping Waters, watercolour 16 x 20". I painted this scene as a demonstration for a 3-day advanced level workshop I taught in my studio in November 2019. I took some photos during class so I could show you the strategies and steps involved in making this painting.

Beach at Neys Provincial Park photo by Karen Richardson

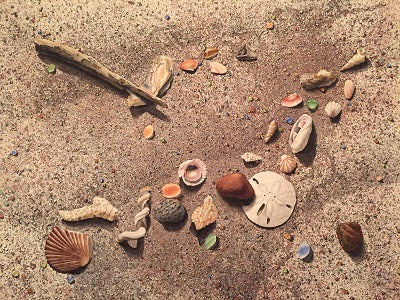
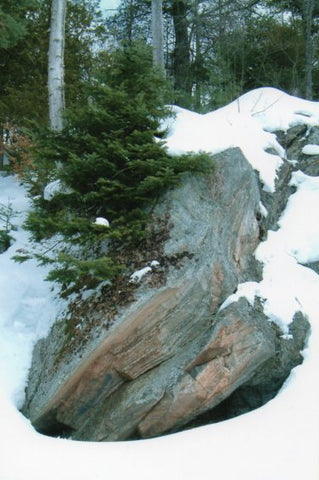
The photo above is one I took on the beach at Ney's Provincial Park, on the north shore of Lake Superior near Marathon, Ontario and was the reference we used for the painting. I gave my students the option of bringing their own photos of driftwood to make their paintings unique.

As is my usual habit, I used just three tubes of paint to mix all the colours I needed for this scene. I don't always use the same primary colours but in this case I used Antwerp Blue, Permanent Alizarin Crimson, and New Gamboge (all by Winsor & Newton) because this brand is easiest for my students to obtain locally.

Because watercolour dries very quickly, I have a small window of time to apply paint before it starts to dry. Since it is easier to paint a small section in 30 seconds than it is to paint a large section in 30 seconds, it is helpful if a scene has distinct sections that can be worked on individually. Conveniently, this scene divides naturally into several horizontal sections and my strategy was to work on one section at a time, starting at the top and working downward. (Sky, deep water, surf, calm water, sand.) 

Lapping Waters layout sketch by Karen Richardson

DAY 1 (plan, sketch, begin painting background)

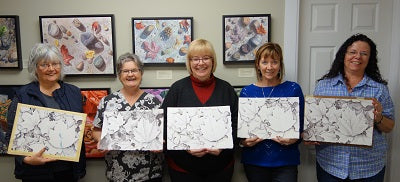
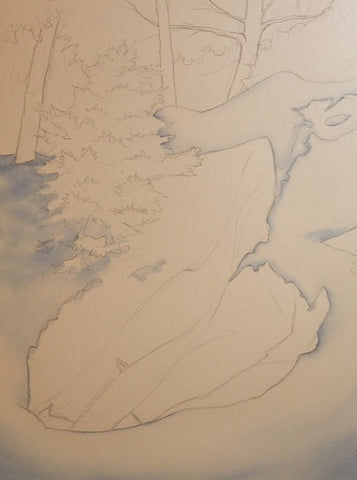
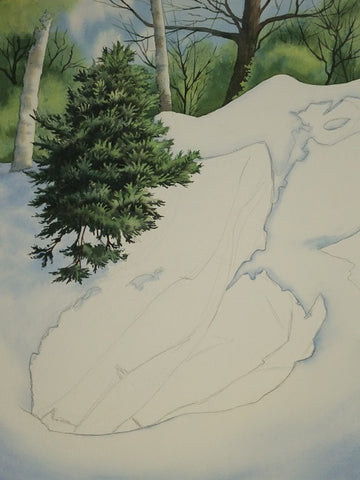
To begin, I sketched a simple contour drawing on graph paper (shown above). This establishes the horizon, the edges of each section of the scene, the shapes of the foam, and the outer shape of the driftwood.

When completed, I traced this sketch using graphite transfer paper onto a 17" by 21" piece of 300 lb Arches cold press bright white watercolour paper. The finished size of the painting would be 16" by 20".

Lapping Waters, watercolour in progress by Karen Richardson

(Shown above) I wet the sky area and painted the upper blue section and then the purple mist section, being careful to leave some of the mist area white in between the colours.

On dry paper, using a paint brush and a water brush, I painted in the darkest shapes of the waves using a golden brown mixture, softening the edges with clear water as I went along. (This is the complementary colour to the blue water, so will read as a dark blue gray once the transparent blue layer goes over top.)

While that area dried, I used liquid masking fluid (my favourite type is Pebeo Drawing Gum which is pale blue) to protect the white highlights of the surf. This is a temporary coating that preserves the white of the paper and allows me to paint around the protected area quickly and evenly. The close-up photo below shows the blue masking fluid in the surf section.

Detail of surf by Karen Richardson

When the masking was dry, I painted gray on top to represent the shadows in the surf. When that paint was dry, I rubbed off the masking fluid with a crepe eraser, revealing white bits of the foam nestled in gray shadows. I added pale blue shadows to the lower edges of the white bits to give them dimension.

DAY 2 (completing hill and lake sections, beginning the sand)

Lapping Waters, watercolour in progress by Karen Richardson

(Shown above) I mixed a dark gray and painted in a hint of the far hill peeking above the mist. I also added a few purple shadows in the mist to give it some form.

I wet the deep section of the lake with clear water and painted blue and dark blue onto the lake surface. I lifted colour here and there, using a clean damp brush, to look like sunlight on the swells in the water.

Lapping Waters, watercolour in progress detail, by Karen Richardson

(Shown above in detail) Using mixtures of green and blue green, I painted in the near headland. Then I touched a wet water brush to the painted areas, leaving soft blooms in the paint that looked like sunlit tree masses. When the greens were dry, I added some tidbits of tan colour to the shoreline to represent the rocky shore.

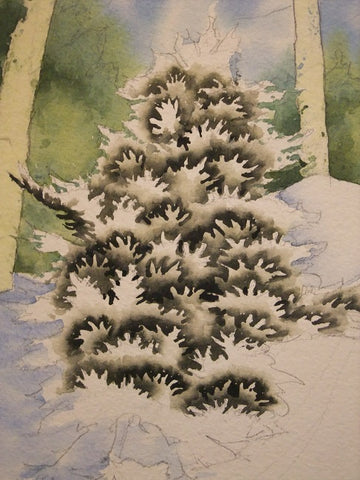
While that area dried, I applied liquid masking fluid to protect the white surf and driftwood.

Lapping Waters, watercolour in progress by Karen Richardson

(Shown above) I wet the middle section (the calm water closest to the beach) with clear water and painted in three colours: pale gray under the far surf, tan across the middle, and darker brown along the leading edge of the wave. These colours had to be applied quickly so they could have equal moisture levels that would dry evenly, with no back runs.

Then I wet the front section (the sand) with clear water and painted on the same three colours I used in the middle section, trying to imitate the placement of the colours according to the reference photo. The pale gray went next to the wave, the tan across the middle, and the darker brown in several areas.

Lapping Waters, watercolour in progress by Karen Richardson

(Shown above) Once the paint was fully dry, I re-wet the sand with clear water and painted on a second layer of the same paint mixtures, in the same areas as before, to deepen the colours.

Lapping Waters, watercolour in progress by Karen Richardson

(Shown in detail above) When the sand area was dry, I added the cast shadows below the foam to give it dimension. After that dried, I rubbed off the masking fluid and painted pale gray shadows within the foam, using the reference photo to get the shapes right.

DAY 3 (completing the sand and driftwood)

Lapping Waters, watercolour in progress by Karen Richardson

(Shown above) I painted the first layer of shadows and texture in the driftwood using a mixture of grays and browns. (Shown in detail below.)

Lapping Waters, watercolour in progress by Karen Richardson


Lapping Waters, watercolour in progress by Karen Richardson

(Shown above) After the first layer of paint dried, I added more layers of colour and shadow to the driftwood, paying careful attention to my reference photo.

Lapping Waters, watercolour in progress by Karen Richardson

(Shown above) After the driftwood was fully dry, I painted the shadows cast on the sand. I was careful to make these graded washes rather than flat washes, to imitate how light reflects back into shadowed areas.

Lapping Waters, watercolour by Karen Richardson

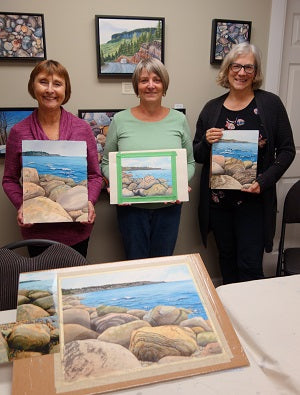
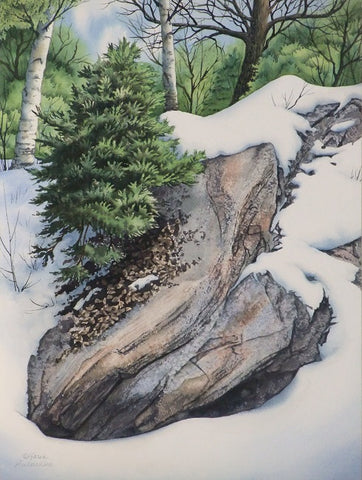
Shown above is my finished demonstration painting.

Students with driftwood beach paintings, workshop taught by Karen Richardson

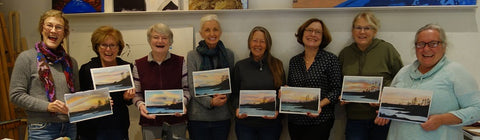
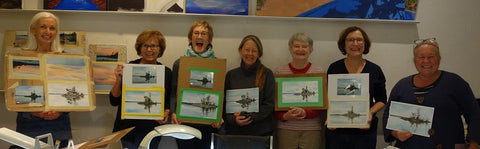
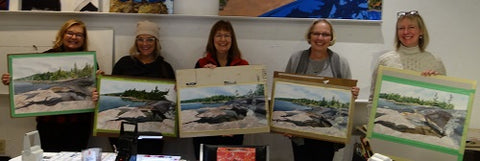
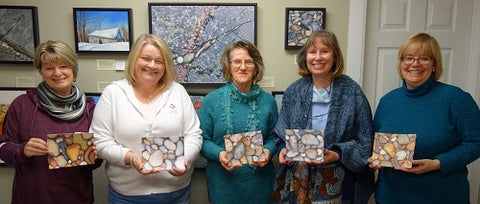
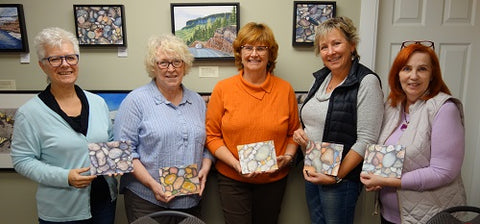
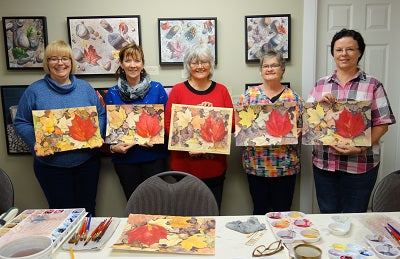
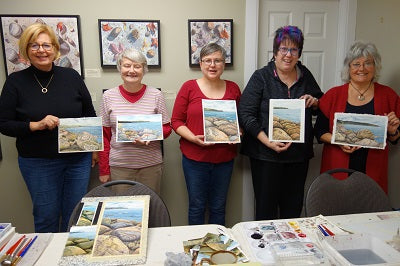
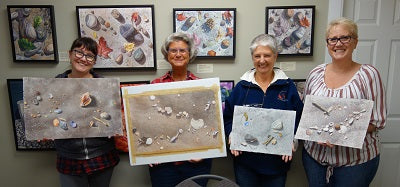
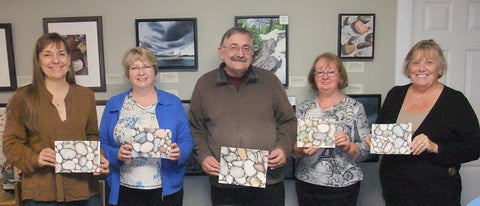
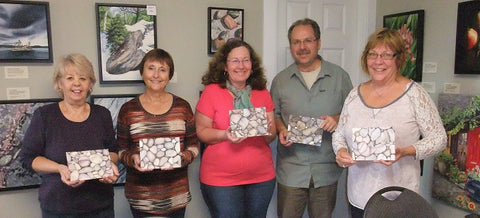
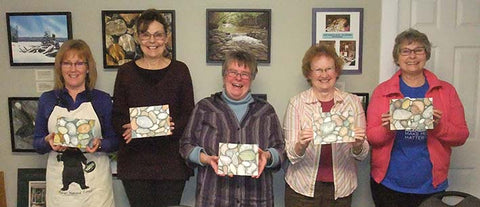
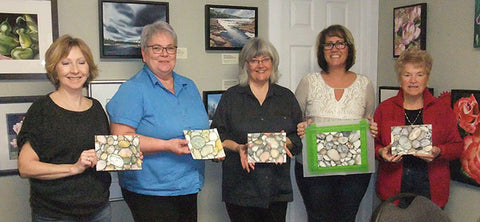
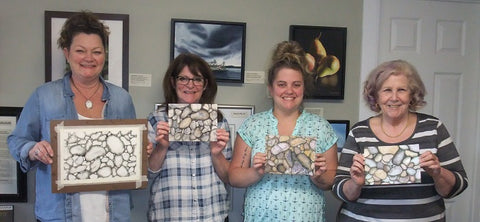
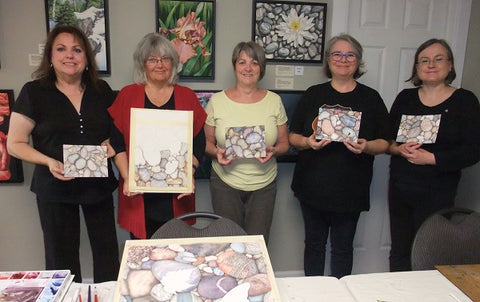
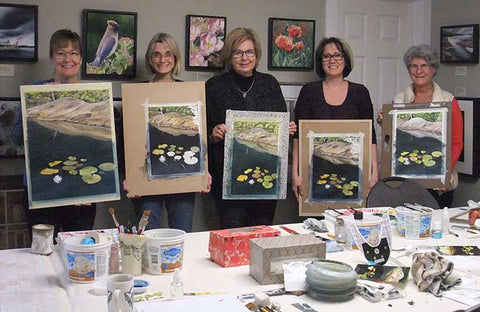
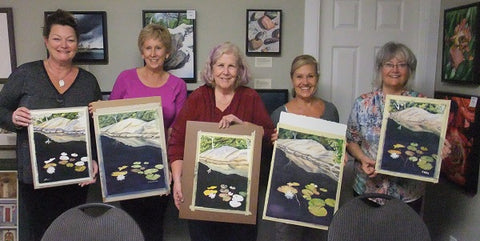
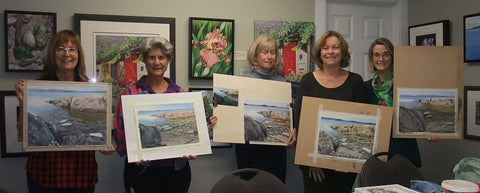
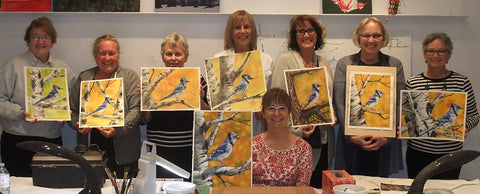
My students were accomplished watercolour painters who worked diligently to recreate this complex scene, and the results are shown above. Each one is a unique interpretation, beautifully done.

My finished painting, titled Lapping Waters, was mounted on a 16 x 20" archival wood panel, then varnished and presented in a black wood floater frame. There is no glass to get in the way of enjoying the details of this scene. I think it successfully represents the stark beauty and warm light of this special place.

For more information about Lapping Waters, click here.

If you have comments you wish to share, please do so using the 'Leave a Comment' button at the top of this post.

Subscribe to Karen's Newsletter for exclusive early access to new work, studio news updates, travel tales, painting tips, and notices of upcoming exhibitions.

Meet My Fall Grads

26 December, 2019 0 comments Leave a comment

Karen Richardson Watercolour Class

This fall, during ten watercolour workshops held at my Lindsay studio, at Meta4 Gallery in Port Perry, and at Colborne Street Gallery in Fenelon Falls, I had the pleasure of guiding 60 students on their painting journeys.

I pack a lot of learning into every class I teach, and enjoy working with students who are keen to absorb and put into practice all the techniques and advice I share with them while we paint together. My students produced some amazing paintings, and I learned some new things along the way too. Below is a photo of me demonstrating a 2-brush technique.

Karen Richardson Demonstrating Watercolour

My most popular workshops teach beginners how to paint smooth beach pebbles. This is a great subject for people without much (or any) art experience, because smooth stones are very easy to draw and the colours don't have to be accurate. As with all my classes, I show how to mix colours for a painting using only the three primary pigments red, blue, and yellow. Pictured below are the graduating students from my 'Pebbles' workshops.

Karen Richardson with her watercolour students


Karen Richardson watercolour students


Karen Richardson watercolour students


Karen Richardson watercolour students

Another popular class subject was 'Island Reflections', taught as a 2-day beginner workshop, once in my studio and once at Colborne Street Gallery. Each student made his or her own unique interpretation based on a reference photo. Shown below is a photo of students working on their paintings in my studio, followed by the graduation photos.

Karen Richardson studio workshop


Students in Karen Richardson's studio workshop


Karen Richardson watercolour workshop

'Misty Lake and Canoe' was a popular class for intermediate level students, held in my Lindsay studio and again at Meta4 Gallery. We worked from multiple reference photos so each student could compose a unique, imaginary scene. Shown below are the graduating students proudly displaying their paintings.

Karen Richardson watercolour workshop

Students in Karen Richardson watercolour class

I taught a 'Rocky Shore' 2-day class again this year, as it was so popular last fall that I had a full waiting list. Shown below are students working on their paintings in my studio, and then the graduation photo.

Karen Richardson watercolour class

Karen Richardson watercolour class

I taught a three-day 'Driftwood Beach' workshop for intermediate/advanced students, that produced amazing results. We all used similar reference photos of the beach and added our own version of driftwood. This scene was a very challenging subject to paint and everyone had fun while learning new skills. Pictured below are my students working on their paintings in my studio, and the graduation photo. 

Karen Richardson watercolour class

Karen Richardson watercolour class

Thank you to all my students, who made a watercolour journey with me this fall. I felt like I learned some things along the way, and I think my students felt the same. It is great to spend time with keen painters.

My next watercolour workshops (1-day, 2-day, or 3-day) will run from mid October to the end of November, 2020.

Subscribe to Karen's Newsletter for exclusive early access to new work, studio news updates, travel tales, painting tips, and notices of upcoming exhibitions.

New Works and the Stories Behind Them

21 January, 2019 5 comments Leave a comment

Canada Rocks #1, watercolour by Karen Richardson

By the time I finished teaching my fall watercolour workshops at the end of November, I had many partially-completed demonstration paintings. My studio was full of 'unfinished business', and I find this visual clutter makes it difficult for me to concentrate. So, in December I got cracking and completed the six paintings shown here. (Click on the pictures for more details about each painting.)

The first three artworks shown here were used to demonstrate painting smooth stones in my Pebbles 1-2-3 single-day workshops. The painting above, 'Canada Rocks #1' includes a collection of reddish pebbles with a red maple leaf resting on a weathered board and represents a rustic version of the Canadian flag. I had such fun painting this one that I came up with a few ideas for other versions of the flag. I'll be working on those this winter.

Superior Lady, watercolour by Karen Richardson

The second pebble painting, 'Superior Lady' (shown above), was inspired by the beautiful beach stones of Lake Superior.  Click here to read about my recent Lake Superior trips and the other paintings they have inspired.

In this painting, I included an American Painted Lady. This is a very common butterfly whose habitat ranges from the sub-arctic to Mexico, east of the Rockies. I deliberately kept the stone colours cool and muted, so the golden tones of this elegant butterfly would shine. 

Superior Monarch, watercolour by Karen Richardson

The remaining pebble painting, 'Superior Monarch' (shown above), also uses Lake Superior beach stones for inspiration, and includes a Monarch butterfly. I had a buyer for this piece before it was even finished, a gentleman who gave it to his wife for Christmas because she was from Sault Ste. Marie (a city on Lake Superior) and was raising Monarchs last summer. I hear she really liked the painting and I am glad it found a home with such an appropriate collector.

Arrived, watercolour by Karen Richardson

'Arrived' (shown above), was the demonstration painting from a three-day advanced workshop. One of my long-time students donated her shell collection so we could use actual objects to paint from (rather than photos). The detail in this piece is incredible, with hundreds of grains of sand, beach glass, stones, and intricate shells. I definitely needed my reading glasses to finish this one!

By the Sugar Shack, watercolour by Karen Richardson

I taught a two-day workshop with this pile of maple leaves on a forest floor as the subject. I called this painting 'By the Sugar Shack' and emphasized the colour contrasts between the newly-fallen red leaf and the older faded leaves. As in all of my paintings, I mixed every colour I needed by combining the three primary colours (red, blue, and yellow). Adding all the blemishes to make the leaves look real took a lot of time, but I liked the result when I was done.

Superior Strength, watercolour by Karen Richardson

Of these six recent works, the painting shown above, 'Superior Strength', is the one to which I feel the strongest connection. It began as my demonstration piece for an advanced watercolour class at Meta4 Gallery in Port Perry.

The students and I worked on our paintings for six weeks at class, with homework in between, and still had several days of work at the end to complete the scene. There is an incredible amount of detail in the trees of the far shore, the cracked and lichen-spotted rocks of the foreground, and the reflective-yet-transparent water in the puddles on the rocks. It was very gratifying to see this master work purchased by one of my collectors, a long-time friend, as a Christmas gift for her parents.

This winter, I look forward to creating more new paintings and sharing with you the stories behind them.

Which painting is your favourite? If you have comments you wish to share, please do so using the 'Leave a Comment' button at the top of this post. 

Subscribe to Karen's Newsletter for exclusive early access to new work, studio news updates, travel tales, painting tips, and notices of upcoming exhibitions.

Meet My Fall Grads

26 November, 2018 0 comments Leave a comment

This fall, during watercolour workshops at my Lindsay studio and at Meta4 Gallery in Port Perry, I had the pleasure of painting with about 50 students. I pack a lot of learning into each class, and enjoy working with students who are keen to absorb all the techniques and advice I share with them.

Here are the graduations photos from the 6-week beginner class held in Port Perry. We finished two small paintings in this Get Wet in Watercolour class. It is hard to believe these are beginner paintings, they turned out so well. But more importantly, we learned about good composition, perspective, how to mix all our colours from the primaries, how to achieve soft effects, detailed effects, and other important aspects of painting.

Northern Sunset class with Karen Richardson

Island Reflection class with Karen Richardson

I also taught an intermediate level 6-week class in Port Perry called Lake Superior Shore. Our paintings are well underway in this photo below.

Lake Superior Shore class with Karen Richardson

The following classes all were held in my Lindsay studio.

My Pebbles 1-2-3 one-day workshop ran three times. Here are the graduation photos from those beginner level sessions. Notice all the smiles and unique pebble paintings! Many students take advantage of the equipment rental I offer with this entry-level class, so they can see if they like watercolour painting before they invest in their own painting materials.

Pebbles 123 workshop with Karen Richardson

Pebbles 123 workshop with Karen Richardson

Pebbles 123 workshop with Karen Richardson

Another popular subject was Maple Leaves, a 2-day workshop that ran twice. I included an 'action' shot below followed by the graduation photo (which shows my demonstration painting in the foreground).

Maple Leaves workshop with Karen Richardson

Maple Leaves workshop with Karen Richardson

The photos below are from the second version of the class and show the paintings after day 1 (base layer done) and day 2 (colour layer done).

Maple Leaves workshop with Karen Richardson 

Maple Leaves workshop with Karen Richardson 

Another very popular subject was my 2-day Rocky Shore class, which ran twice and had so many on the wait list that I plan to teach this subject again next fall. Here are the graduation photos, with my demonstration paintings in the foreground.

Rocky Shore class with Karen Richardson

Rocky Shore class with Karen Richardson

I taught a three-day Sea Shells on Sand workshop for intermediate/advanced students, that produced amazing results. Rather than a reference photo, we used actual shells (donated by one of the students), as well as sea glass and bits of driftwood, to make unique creations. Pictured below are my students with paintings well underway.

Sea Shells and Sand class with Karen Richardson

Pictured below is one of my student's paintings that she finished after class:

Sea Shells and Sand class with Karen Richardson


Thank you to all my students, who made a watercolour journey with me this fall. Together, we learned a lot!

I will not be teaching spring classes due to a heavy work schedule in my studio. My Fall 2019 Workshops (1-day, 2-day, or 3-day) will run within the mid October to end of November time frame. 

Subscribe to Karen's Newsletter for exclusive early access to new work, studio news updates, travel tales, painting tips, and notices of upcoming exhibitions.

Meet My Spring Grads

21 June, 2018 0 comments Leave a comment

This spring, during watercolour workshops at my Lindsay studio, I had the pleasure of painting with 25 students.

Half of them were in my Pebbles 1-2-3 one-day workshops. Here are the graduation photos from those beginner level sessions. Notice all the smiles! In the first photo, you can see my demonstration painting in the foreground.

Pebbles 123 Beginner Watercolour Class by Karen Richardson

Pebbles 123 Beginner Watercolour Class by Karen Richardson

Pebbles 123 Beginner Watercolour Class by Karen Richardson

Another popular subject was Weathered Wood and Stones, a 2-day workshop that ran twice. I included some 'action' shots below.

Weathered Wood and Stones watercolour class by Karen Richardson

Weathered Wood and Stones watercolour class by Karen Richardson

Isn't it remarkable how different each painting is, even though we used the same reference photo? We used actual stones for individual inspiration. The photos below are from the second version of the class.

Weathered Wood and Stones watercolour class by Karen Richardson

Weathered Wood and Stones watercolour class by Karen Richardson

I taught a three-day Sea Shells on Sand workshop for intermediate/advanced students, that produced amazing results. Rather than a reference photo, we used actual shells (donated by one of the students), as well as sea glass and bits of driftwood, to make unique creations. Pictured below are me and my students with our paintings well underway.

Sea Shells on Sand advanced watercolour class with Karen Richardson

Pictured below is a finished painting by one of my students:

Student work from Sea Shells on Sand workshop with Karen Richardson 

And here is my finished demonstration painting Seaside Treasures, including a few detail shots:

Seaside Treasures, watercolour by Karen Richardson

Seaside Treasures (detail), watercolour by Karen Richardson

Seaside Treasures (detail), watercolour by Karen Richardson

Click here for more details about Seaside Treasures.

Thank you to all my students, who made a watercolour journey with me this spring. Together, we learned a lot!

My Fall 2018 Workshops (1-day, 2-day, or 3-day) will run within the mid October to end of November time frame and will feature some of the same popular subjects that I taught in the spring. 

Subscribe to Karen's Newsletter for exclusive early access to new work, studio news updates, travel tales, painting tips, and notices of upcoming exhibitions.

Fitting In a Winner

15 April, 2018 1 comment Leave a comment

Fitting In, watercolour by Karen Richardson    

Last fall, I created this watercolour painting from a photo taken in Nova Scotia during our 2017 Maritime trip.

I love the apparent simplicity of this composition, with three smooth pebbles sitting in a cleft of weathered driftwood. But the image implies a more complex meaning to me; one of shelter, security, togetherness, and family.

When the painting was completed, I posted a picture of it on Facebook, to ask my online friends for suggestions for a title. The image got a strong response, with about 50 title ideas coming forward. The one I selected was 'Fitting In', but I made note of all the suggestions, to use on future paintings I am creating in a series about cracks and crevices. An artist friend also suggested I add a living creature to the driftwood cleft, peeking over the stones. Hmmm... food for thought.

Karen Richardson with her painting 'Fitting In' at the 2017 PineRidge Juried Art Exhibition.

Then I entered 'Fitting In' in the This Is Home painting competition, sponsored by Artwork Archive. My artwork took first place with over 800 votes on Facebook, winning the Voter's Choice award of US$300. A few weeks later, two of my paintings, including 'Fitting In', were accepted into the PineRidge Arts Council 18th Annual Juried Art Exhibition (shown above). This competition had 190 pieces submitted by 103 artists, with only 65 paintings being accepted into the show by the juror.

During this time, I recognized that this image would be an excellent subject for a watercolour class, allowing me to teach several key aspects, such as choosing a focal point, contrasting light and dark, depicting smooth and rough textures, and mixing subdued colours, to name a few.

So this spring, I taught this subject twice in classes held in my Lindsay studio, and my instincts were correct; my students LOVED painting this scene and learning all I could impart along the way. They used actual stones from my rock collection as reference, to make their creations unique.

Here are photos of my students with their finished pieces:

Weathered Wood and Stones, 2-day watercolour class by Karen Richardson

Weathered Wood and Stones, 2-day watercolour class by Karen Richardson

Several of the students made comments after class:

"I learn so much when I take workshops with you. You have such a fantastic knowledge base. You explain the why as well as the how! Painting in your studio, surrounded by your incredible paintings, is such an inspiration. And you are a joy as a teacher! Thanks a million for an incredible time!" ~Diane S.

"We had such a wonderful time. I learned SO much about handling watercolour and how to achieve different textures. The "ah ha" moment for me was learning how to mix all those subtle colours from just three primaries. Karen is an awesome teacher who is able to convey so much of her knowledge and experience to her students." ~Jan Z.

"Thank you so much for the whole experience. It was such an inspiring and educational two days. I know that is due to your organization, presentation and overall thoughtfulness of your students. I did not really believe I could leave that workshop with a piece of art that resembled what Jan had shown me after she attended the 'Pebbles' workshop. What an amazing feeling that was... Thank you again for sharing your expertise and delighting in the pleasure that your 'gift' brings others." ~Roz G.

I made a new demonstration painting during each session, to show the students various painting techniques, and I decided to add a living creature to each one, to make paintings that were different from my first version. Here are the three paintings shown as a series:

Fitting In, watercolour by Karen Richardson   Curiosity, watercolour by Karen Richardson   A Moment's Rest, watercolour by Karen Richardson

In considering appropriate titles, I first came up with 'Fitting In', 'Sitting In', and 'Flitting In' for the series. Then I thought, since possibly these three paintings will end up in the hands of separate collectors, the humour might be lost. I decided a more appropriate title for the version with the squirrel would be 'Curiosity', and for the version with the butterfly, 'A Moment's Rest'. I would love to hear your thoughts on titles.

These three paintings, part of a group of almost 40 pieces, will be on display at my Spring Open Studio (weekend of April 28 and 29, 1 to 5 pm) in Lindsay. I hope you can meet the trio in person. One can't help but smile when seeing them.

If you have any comments or suggestions, please let Karen know by clicking on the 'Leave a Comment' button at the top of this post.

Subscribe to Karen's Newsletter for exclusive early access to new work, studio news updates, travel tales, painting tips, and notices of upcoming exhibitions.

The Making of 'Northern Reflections'

05 March, 2018 2 comments Leave a comment

I grew up in the Canadian Shield region of Canada, just east of Algonquin Park. The northern Ontario landscape of my childhood - lakes, rivers, pine trees, sand, and rock - remains vividly in my mind to this day. The majority of my paintings contain one or more of these landscape elements.

Karen Richardson on Stoney Lake

The last few summers, my husband and I visited with long-time friends at their cottage on Stoney Lake in central Ontario. The above photo of me was taken on their boat when we were cruising the lake.

I have taken many beautiful photographs of the scenery on Stoney, which looks similar in many ways to the region in which I spent my childhood. The photo below is the view from our friends' dock.

Photo of Stoney Lake by Karen Richardson

I decided this would be a great reference photo for a six-week advanced watercolour class I taught at Meta4 Gallery in Port Perry last fall. The scene had interesting reflections, rocks, mosses, lily pads, and tree trunks.

Here are some photos of my students at work on their paintings.

Students in Karen Richardson's watercolour class

Students in Karen Richardson's watercolour class

Below are photographs of my demonstration painting, showing how it progressed. The lower half is already finished. I used a new and unusual method for painting the reflections on the water, and became so engrossed in the process that I forgot to pause and take photos in those earlier stages. 

Northern Reflections, watercolour in progress by Karen Richardson.

In the first photo (above), the base layer has been applied to the rocks, moss, and forest greenery. Salt was sprinkled on the stone and moss while the paint was wet, to create a textured effect. When dry, the salt was brushed off.

 Northern Reflections, watercolour in progress by Karen Richardson

In the second photo (above), the upper left quadrant has the second layer done. I used two-brush technique, (one brush loaded with paint and the second brush loaded with water), working on dry paper. This allows control of the paint flow to a minute degree.

Northern Reflections, watercolour in progress by Karen Richardson

In the third photo (above), the second layer of paint has been applied to the upper right quadrant. The painting is about 95% finished at this point. The remaining steps are to go over the whole painting, adding more dark shadows into the forest background, and adding more texture to rocks and moss using a dry-brush technique.

Karen Richardson with her watercolour students

The photo above shows me and my students with our finished paintings. Everyone did an amazing job and enjoyed learning some new techniques. No two paintings looked alike, even though we used the same reference photo.

Northern Reflections, watercolour by Karen Richardson 

Here is a photo of the finished painting in its frame. Northern Reflections, watercolour, 16 x 20". I am very pleased with the way it turned out. When I look at my painting, I feel like I am back in a little piece of heaven on a northern lake. Click here for more details about this piece.

What is your favourite region to visit? If you have comments you wish to share, please do so using the 'Leave a Comment' button at the top of this post. 

Subscribe to Karen's Newsletter for exclusive early access to new work, studio news updates, travel tales, painting tips, and notices of upcoming exhibitions.

The Artist's Studio

05 February, 2018 9 comments Leave a comment

Karen Richardson's Studio

At the end of last year, I took some time to catch up on paperwork in my studio office, finish some framing, and do a general studio tidy-up. Once that was done, everything looked so uncluttered and clean I took some photos to show you what a working artist's studio looks like. I also want to share with you some key features that make my creative space both comfortable and efficient. Welcome to your personal virtual studio tour!

When you come down the stairs to enter my studio, you see the panorama shown above. It is an L-shaped space, with my creative area on the left and my gallery and teaching space on the right.

Our home is a bungalow with 8' ceilings on both levels. In the lower level, large above-ground windows face west and north, to fill the space with light so it doesn't feel like a basement. We added four 2' x 4' LED ceiling light fixtures that greatly enhance the natural illumination.

Karen Richardson's Studio

The photo above shows my studio office. The desk and black file cabinet on the right house my computer and day-to-day office files and reference binders. On top are white photo storage boxes containing reference photos I have taken, sorted by subject matter and season. I take thousands of photos but just print the ones I think I may use as painting reference some day.

The white bookcase on the left mainly holds my collection of painting technique reference books, plus office stationary. The glass doors keep the dust out and make it easy to find what I'm looking for. The window in the middle is the one on which my wild turkey visitor knocked last month.

Karen Richardson's Studio

The photo above shows my office and creative space. On the left is my trusty collapsible print rack that I take to art shows as well as use in the studio, to display my giclee prints and matted paintings. The small bookshelf in front displays Watercolour Toolbox, the art instruction book I wrote. On top of the desk hutch is the satellite radio receiver that supplies whatever genre of music I choose, to keep me company as I work. Mostly I listen to soft rock or quiet jazz.

On the back wall is the tiny gas fireplace we added to this space, to make it cosy in cooler weather. I have it on all day, every day in winter. To the right of that, under the north window, is the drafting table where I do most of my painting. The working surface is 3' x 4', large enough for a full sheet of watercolour paper plus reference photos displayed to the sides.

In front of that is a desk credenza just over 5' long, that is very handy for assembling frames or doing any job needing a large horizontal surface. When one of my painting buddies comes here, she works at this desk while I paint at the drafting table.

Karen Richardson's Studio

To the right of my drafting table is an Ikea cabinet I bought over 30 years ago. It primarily stores unused framing materials, painting supports, paint palettes, paint tubes, and rags. The photo above shows it with the doors open. The adjustable shelves are 24" x 30", so this cabinet stores a lot of stuff.

Karen Richardson's Studio

Continuing around my creative space to the right, I have a black flat file cabinet that holds an astounding amount of watercolour paper, paintings in progress, brushes and other art supplies, office supplies, giclee prints, art card supplies, and archival bags. I bought this used metal cabinet from one of my framing suppliers when they no longer needed it, and I had it repainted at an automotive paint shop. Each of the ten drawers is 2' x 3' inside, so that is 60 square feet of horizontal storage in total. I love the efficiency of this cabinet! 

Around the corner to the right is my painting display space. I have professional grade wall hooks spaced 24" apart horizontally, with a second row 20" below the top row. This layout fits most sizes of finished paintings, without having to move hooks, although some of the larger pieces may cover two hooks.

Karen Richardson's Studio

My display space shown above consists of three walls, one 10 feet wide, one 12 feet wide, and one 8 feet wide. There is a short hallway to the right with display walls 2 feet and 6 feet wide. This gives me a total of 38 linear feet of gallery space. This is also the room I use for teaching my watercolour workshops. I teach up to five students at a time, and we each work on a 2' x 4' portable table. The photo below shows a typical class (and a different display of paintings).

Watercolour workshop in Karen Richardson studio 

No art studio or teaching space would be complete without a bathroom. In the photo below, you can see the bathroom we added on this level when we renovated. I also display a couple of finished paintings in there.

Karen Richardson's Studio

This completes the tour of the public area of my studio practice. The photos below show more studio storage and equipment that is in our furnace room and not accessible to the public (except on this virtual visit).

Karen Richardson studio

Shown above is my wonderful automotive storage rack. Each shelf is capable of supporting up to 500 lbs. This rack stores my painting transport boxes, shipping materials, business records, bulk storage of Watercolour Toolbox books, art show lighting equipment, framing materials, as well as some household items. Those 13 binders on the right are scrapbooks that document my entire art career to date (paintings, awards, shows, etc.). All this on a bit of floor measuring 2' x 6'.

Below, also in the furnace room, is my mat- and cardboard-cutting table. The slots underneath store mat board, and painting transport boxes, bags, and portfolios. The drawers hold my framing hardware, tools, and equipment.

Karen Richardson studio

I hope you have enjoyed your personal virtual art studio tour. I hope to see you in person in my studio at some point in the future.Visitors are welcome by appointment, or during an Open Studio event.

If you have comments you wish to share, please do so using the 'Leave a Comment' button at the top of this post. 

Subscribe to Karen's Newsletter for exclusive early access to new work, studio news updates, travel tales, painting tips, and notices of upcoming exhibitions.

The Making of 'Snow and Stone'

22 January, 2018 4 comments Leave a comment

Snow and Stone, watercolour by Karen Richardson

Last year I instructed a six-week watercolour class at Meta4 Gallery in Port Perry, for intermediate level students (meaning they have extensive watercolour experience). I chose this winter scene of a big rock and a fir tree because it would provide an opportunity to work with several different painting techniques, and I love to paint rocks in any setting. My finished 16 x 12" demonstration painting is shown above.

Snow and Stone watercolour workshop taught by Karen Richardson 

This is the graduation photo from our class. You can see all the students worked hard and did a great job on their paintings. Each piece looked different than the rest, which is always the case in my classes. I encourage students to make their own way when developing their compositions, such as in choice of paint mixtures, or in the amount of detail they want to achieve.

Reference photo for Snow and Stone, taken by Karen Richardson

The reference photo above was one I took many years ago on a snowmobile trip in northern Ontario. I liked the composition, but would have to use some imagination to make the flat lighting more interesting and to simplify the background.

Snow and Stone, work in progress by Karen Richardson

Step #1 (above) Drawing / Snow Shadows

I began by sketching the scene on layout paper, making all corrections before tracing my drawing onto Arches 300 lb. cold pressed bright white watercolour paper. Then I decided the best angle for 'invented' sunshine would be from the upper right.

As with all my paintings, I used a limited palette of paint colours for this scene. With just yellow (New Gamboge), blue (French Ultramarine), and dark brown (Burnt Umber) I mixed all the colours needed for this scene. I wet all the snow area with clear water, and brushed on a watery blue mixture everywhere the imagined sunlight would not fall, to give the effect of snow shadows. The sunlit snow was just the clean white of the paper.

Snow and Stone, work in progress by Karen Richardson

Step #2 (Above) Masking / Base Layer on Forest and Fir Tree

Once the snow shadows were dry, I applied masking fluid to the trunks of the birch trees, to make sure they stayed white while I painted the scene around them. This masking layer will be removed near the end of the painting process, just prior to painting the birch trunks.

While the masking dried, I mixed up a bright green and a medium green, using different combinations of blue and yellow. I wet the entire background above the snow line and dropped in bright green where the imagined sunlight would fall. Then I added sections of medium green where shadows or coniferous trees would be. I made sure to leave space for the sky, into which I placed a few strokes of blue to give a soft cloud effect.

While the background dried, I mixed up a dark brownish green for the foreground tree shadows, using all three colours. For my main subjects, I often paint the shadows first, let them dry, and then paint the actual colours of the subject over top. This sequencing allows me to place my shadows accurately, while I can clearly see my pencil lines. If I paint the subject colours first, they can obliterate my pencil lines, and my shadow shapes then require some guess work.

Snow and Stone, detail of work in progress by Karen Richardson

Step #2 Detail (Above) Negative Painting on Fir Tree

I painted the fir tree shadows onto dry paper, using a negative-painting-with-two-brushes technique. One round brush held the paint and the other round brush held clear water. Working on dry paper, I applied the paint above the highlight shapes of each needle cluster, and then placed clear water immediately above, but just touching, the painted section. The areas of wet paint and water flowed together slightly, creating a soft transition. It takes a lot of practice to judge the amount of fluid needed to create this effect, which is why this subject was a great learning experience.

Snow and Stone, work in progress by Karen Richardson

Step #3 Second Layer on Forest and Fir Tree

Once the fir tree shadows had dried, I erased the masking layer from the birch trunks. Then I painted the entire fir tree with a couple of green mixtures, making sure to keep the lighter ones on the upper right, the sunlit side of the tree. Since watercolour is a transparent medium, the shadow layer showed through the second layer.

When the fir tree was dry, I painted the birch trunks with whispers of pale blue and pale brown paint on the left halves of the trunks, and clear water on the right halves, to give a cylindrical effect. I painted the branches and tree trunks in the forest with a dark brown mixture, making sure to lighten the colour on the right and upper sides by adding some water.

Snow and Stone, watercolour by Karen Richardson

Step #4 Completing the Forest / Painting the Rock

I added some negative painting effects to the forest shrubbery and tree masses, using a dark green mixture. This gave the effect of sunlight falling on the forest and made it more three dimensional than in the reference photo. Once dry, and to finish the forest, I added more twigs and small branches, and dark scars on the birch trunks, using my rigger brush and calligraphy pen.

Getting ready to paint the first layer on the rock, I masked out the dried leaf shapes and blobs of snow underneath the fir tree. When that had dried, I used a rigger brush with dark gray-brown paint to create the dark cracks in the rock and the shadows between the dried leaves. Once dry, I used my two-brush technique with the same paint to create the softer shadows on the underside of the rock. Then I let the paint dry fully.

For the colour layer on the rock, I made pale mixtures of gray-blue and gray-brown. I wet the entire rock with clear water, brushed in the two colours using the reference photo as a placement guide, then sprinkled on table salt and left the painting to dry over night. Then the salt was rubbed off, leaving a pale patch in the colour where each salt crystal had been.

I removed the masking fluid and painted the leaves and snow beneath the tree. I added some tiny twigs in the snow here and there to complete Snow and Stone, watercolour 16 x 12". Click here for more photos and details of the finished painting. I thought it turned out incredibly well. What do you think? Please share your comments by using the 'Leave a Comment' button at the top of this post. Thank you.

If you have comments you wish to share, please do so using the 'Leave a Comment' button at the top of this post. 

Subscribe to Karen's Newsletter for exclusive early access to new work, studio news updates, travel tales, painting tips, and notices of upcoming exhibitions.

100 Smiles from a Year of Watercolour Workshops

26 December, 2017 0 comments Leave a comment

Karen Richardson teaching watercolour students in her Lindsay, Ontario studio

This year, during watercolour workshops at my Lindsay studio, and weekly classes at Meta4 Gallery in Port Perry, I had the pleasure of painting with almost 100 students.

Over one third of them were in my Pebbles 1-2-3 one-day workshops, held in my Lindsay studio in spring and fall. Here are photos from those beginner level workshops. Notice all the smiles:

Pebbles 1-2-3 watercolour workshop at Karen Richardson studio

Pebbles 1-2-3 watercolour class in Karen Richardson studio

Pebbles 1-2-3 watercolour workshop grads in Karen Richardson studio

Pebbles 1-2-3 watercolour workshop grads in Karen Richardson studio

Pebbles 1-2-3 watercolour class at Karen Richardson studio

Pebbles 1-2-3 watercolour class at Karen Richardson studio

Pebbles 1-2-3 watercolour students in Karen Richardson studio

In this final Pebbles 1-2-3 grad photo below, you can see my demonstration painting (Time to Head South) in the foreground:

Pebbles 1-2-3 watercolour class at Karen Richardson studio

These students below were in my 2-day beginner Tulips class:

Tulips watercolour class at Karen Richardson studio

I taught a Muskoka Lily 2-day intermediate level class twice. My finished demonstration painting is titled Stillwater Lily (click here to view).

Muskoka Lily watercolour class grads Karen Richardson studio

Muskoka Lily watercolour class at Karen Richardson studio

Here are me and my students in a 3-day advanced level Lake Superior Bay class:

Lake Superior Bay watercolour class grads in Karen Richardson studio

These students below are working on their Hollyhocks and Stone paintings in my 3-day advanced level class. My finished demonstration painting is titled Hollyhock and Stone (click here to view).

Hollyhocks and Stone watercolour class in Karen Richardson studio

Below are me and my students in a 3-day intermediate level Flag Iris class:

Flag Iris watercolour class in Karen Richardson studio

The photos below are graduation photos from my 6-week class sessions at Meta4 Gallery in Port Perry.

Northern Reflections: (Click here to view my finished demonstration painting)

Karen Richardson with her students in a Northern Reflections watercolour class

White Breasted Nuthatch: (Click here to view my finished demonstration painting.)

White Breasted Nuthatch watercolour class with Karen Richardson

Snow and Stone: (Click here to view my finished demonstration painting.)

Snow and Stone watercolour class with Karen Richardson

Blue Jay:

Blue Jay watercolour class with Karen Richardson

Thank you to all my students, who made a watercolour journey with me in the last year. Together, we learned a lot!

My Spring 2018 classes will run from mid March to the end of April. Registration will open in February, and I will email you the schedule then if you are subscribed to my studio updates. 

If you have comments you wish to share, please do so using the 'Leave a Comment' button at the top of this post. 

Subscribe to Karen's Newsletter for exclusive early access to new work, studio news updates, travel tales, painting tips, and notices of upcoming exhibitions.

1 2 3 Next »