The Making of 'Snow and Stone'
22 January, 2018 4 comments Leave a comment
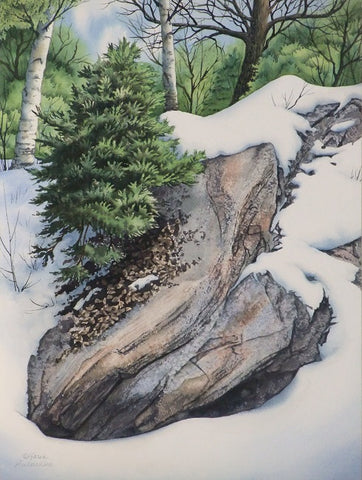
Last year I instructed a six-week watercolour class at Meta4 Gallery in Port Perry, for intermediate level students (meaning they have extensive watercolour experience). I chose this winter scene of a big rock and a fir tree because it would provide an opportunity to work with several different painting techniques, and I love to paint rocks in any setting. My finished 16 x 12" demonstration painting is shown above.

This is the graduation photo from our class. You can see all the students worked hard and did a great job on their paintings. Each piece looked different than the rest, which is always the case in my classes. I encourage students to make their own way when developing their compositions, such as in choice of paint mixtures, or in the amount of detail they want to achieve.
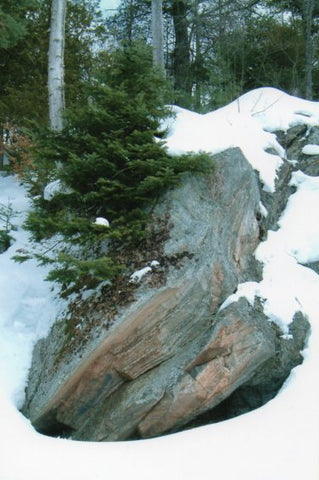
The reference photo above was one I took many years ago on a snowmobile trip in northern Ontario. I liked the composition, but would have to use some imagination to make the flat lighting more interesting and to simplify the background.
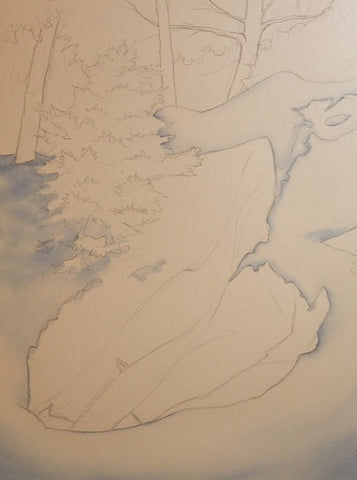
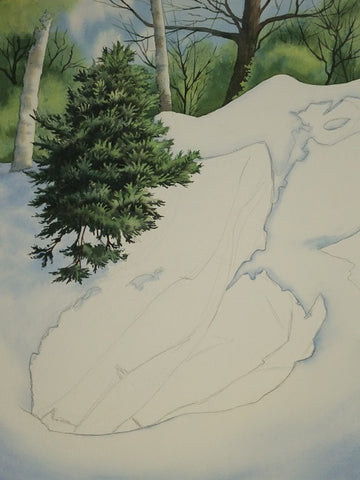
Step #1 (above) Drawing / Snow Shadows
I began by sketching the scene on layout paper, making all corrections before tracing my drawing onto Arches 300 lb. cold pressed bright white watercolour paper. Then I decided the best angle for 'invented' sunshine would be from the upper right.
As with all my paintings, I used a limited palette of paint colours for this scene. With just yellow (New Gamboge), blue (French Ultramarine), and dark brown (Burnt Umber) I mixed all the colours needed for this scene. I wet all the snow area with clear water, and brushed on a watery blue mixture everywhere the imagined sunlight would not fall, to give the effect of snow shadows. The sunlit snow was just the clean white of the paper.

Step #2 (Above) Masking / Base Layer on Forest and Fir Tree
Once the snow shadows were dry, I applied masking fluid to the trunks of the birch trees, to make sure they stayed white while I painted the scene around them. This masking layer will be removed near the end of the painting process, just prior to painting the birch trunks.
While the masking dried, I mixed up a bright green and a medium green, using different combinations of blue and yellow. I wet the entire background above the snow line and dropped in bright green where the imagined sunlight would fall. Then I added sections of medium green where shadows or coniferous trees would be. I made sure to leave space for the sky, into which I placed a few strokes of blue to give a soft cloud effect.
While the background dried, I mixed up a dark brownish green for the foreground tree shadows, using all three colours. For my main subjects, I often paint the shadows first, let them dry, and then paint the actual colours of the subject over top. This sequencing allows me to place my shadows accurately, while I can clearly see my pencil lines. If I paint the subject colours first, they can obliterate my pencil lines, and my shadow shapes then require some guess work.
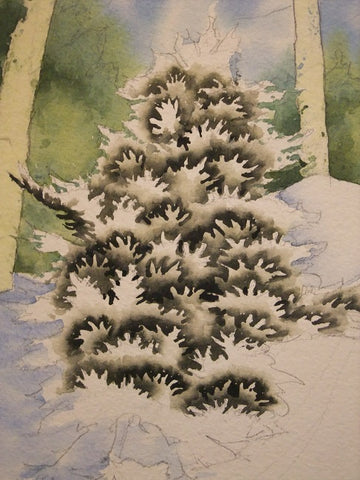
Step #2 Detail (Above) Negative Painting on Fir Tree
I painted the fir tree shadows onto dry paper, using a negative-painting-with-two-brushes technique. One round brush held the paint and the other round brush held clear water. Working on dry paper, I applied the paint above the highlight shapes of each needle cluster, and then placed clear water immediately above, but just touching, the painted section. The areas of wet paint and water flowed together slightly, creating a soft transition. It takes a lot of practice to judge the amount of fluid needed to create this effect, which is why this subject was a great learning experience.
Step #3 Second Layer on Forest and Fir Tree
Once the fir tree shadows had dried, I erased the masking layer from the birch trunks. Then I painted the entire fir tree with a couple of green mixtures, making sure to keep the lighter ones on the upper right, the sunlit side of the tree. Since watercolour is a transparent medium, the shadow layer showed through the second layer.
When the fir tree was dry, I painted the birch trunks with whispers of pale blue and pale brown paint on the left halves of the trunks, and clear water on the right halves, to give a cylindrical effect. I painted the branches and tree trunks in the forest with a dark brown mixture, making sure to lighten the colour on the right and upper sides by adding some water.
Step #4 Completing the Forest / Painting the Rock
I added some negative painting effects to the forest shrubbery and tree masses, using a dark green mixture. This gave the effect of sunlight falling on the forest and made it more three dimensional than in the reference photo. Once dry, and to finish the forest, I added more twigs and small branches, and dark scars on the birch trunks, using my rigger brush and calligraphy pen.
Getting ready to paint the first layer on the rock, I masked out the dried leaf shapes and blobs of snow underneath the fir tree. When that had dried, I used a rigger brush with dark gray-brown paint to create the dark cracks in the rock and the shadows between the dried leaves. Once dry, I used my two-brush technique with the same paint to create the softer shadows on the underside of the rock. Then I let the paint dry fully.
For the colour layer on the rock, I made pale mixtures of gray-blue and gray-brown. I wet the entire rock with clear water, brushed in the two colours using the reference photo as a placement guide, then sprinkled on table salt and left the painting to dry over night. Then the salt was rubbed off, leaving a pale patch in the colour where each salt crystal had been.
I removed the masking fluid and painted the leaves and snow beneath the tree. I added some tiny twigs in the snow here and there to complete Snow and Stone, watercolour 16 x 12". Click here for more photos and details of the finished painting. I thought it turned out incredibly well. What do you think? Please share your comments by using the 'Leave a Comment' button at the top of this post. Thank you.
If you have comments you wish to share, please do so using the 'Leave a Comment' button at the top of this post.
Subscribe to Karen's Newsletter for exclusive early access to new work, studio news updates, travel tales, painting tips, and notices of upcoming exhibitions.


Love your painting, Karen! Thank you for sharing your process too.
BEAUTIFUL!!!!
Always like to know how you develop a painting. Love the result.
LOVE your work, and your generosity of spirit. You take the time to explain the ‘whys,’ which make your classes great learning experiences! Thanks for sharing!